Easy Popsicle Stick Easel

Decorating can be hard, especially when one is endeavoring to do so on a budget, but if you’ve been here for any length of time, you are well aware that I am the queen of making a whole new wall out of a bit of trash and some glue. As a kid I tried to make just about anything out of scotch tape and pipe cleaners, so I suppose it makes sense. Either way, one problem that I have come upon more than once is finding a proper way to display some of my more traditional creations (think flat art projects).

When I first moved out, my solution was simply to put my embroidery hoops on strings and run them down the wall, but now that I have my lovely ‘fireplace‘ on that wall, I needed something else. Enter the miniature easel. This has been a staple of my decorating vocabulary basically forever, as both my mother and grandmother are experts at making use of them in all their various sizes for everything from paintings to glass cutting boards. However lacking an extensive easel collection of my own, and with prices ever increasing, I found that an easel of the size I desired would set me back a minimum of seven dollars. So of course I decided to make one myself.

Popsicle sticks remain one of the craft supplies that are nearest and dearest to my heart, right up there with pipe cleaners as something that remain consistently inexpensive because they are intended for children. They are however infinitely useful and versatile.

If you’re not familiar, popsicle sticks come in 2 standard sizes, small which are about 1/4 of an inch wide and large which are about a half inch. This project uses 6 small sticks and 1 large one, as well as a bit of twine, about 2″ of narrow ribbon, and some glue.

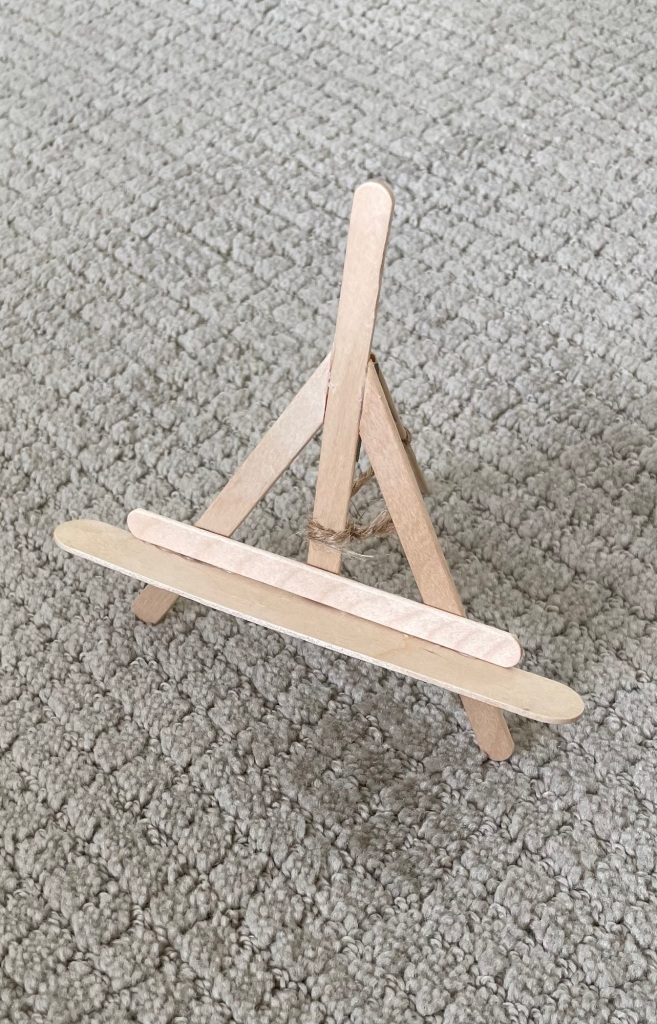
Easels come in several configurations depending on size and what you want to hold, but for this I’m going with a traditional 3 legged artist’s easel style. To make the frame I cut 2 popsicle sticks at a 60 degree angle, gluing them to either side of a third.

I prefer to cut popsicle sticks with my craft knife, or a box cutter. They will dull blades pretty quickly but they don’t need something super sharp to cut them. Scissors will work in a pinch on the large ones (the small ones are usually too thick), but they come with a high risk of splitting the stick lengthwise.

To stabilize the main structure, I then added a cross piece at the height I wanted the ledge to sit. With that in place, I took my large stick and glued it perpendicular to the cross bar, taking care to center it.

Now to make this a functional structure, it needs a third leg. For this I cut off one end of a small stick straight across. Then, I glued the ribbon to it and the frame forming a hinge.

To keep it secure, I tied the twine to the center stick in the frame, and to the leg setting how far it could open and avoiding unnecessary pressure on the makeshift hinge.

And there you have it, a very functional little easel made entirely of popsicle sticks! This is the perfect place to display your art, or add some depth and interest to the tray of Knick knacks in the corner. Would you try this? leave a comment to let us know!

If you’re interested in more shenanigans, try joining the PPP family! It’s completely free and you get access to our full Freebie library.

Processing…
Success! You're on the list.

March Free Printables

Here we are, it seems crazy that it’s already March! But, to mark the passage of time we have another set of printables, this time with a bit of a St Patrick’s day theme to them, I hope you enjoy!

PPP Family members can access our freebies here.

If you’re not a member you can join and gain access to our entire freebie library below.

Not a member? Join now for free!

Processing…
Success! You're on the list. You should receive an email with the password shortly, in the meantime, the files for this project can be found here: https://drive.google.com/file/d/12M2nx4IbwxfTGeWS4fVSiJlo_U_rnllu/view?usp=drive_link

You might also like…

February Free Printables

Mardi Gras comes before Valentine’s Day this year if only barely (its the 13th if you were wondering) so that is the inspiration for this month’s collection of printables! Here’s to February and Let the good times roll!

PPP Family members can access the printable here.

If you’re not already a part of the PPP family, you can access the freebie library by signing up here:

Processing…
Success! You're on the list. You should receive an email with the password shortly, in the meantime, the files for this project can be found here: https://drive.google.com/file/d/1SOPLUvvz5i0N8fwh5JznQRO4zUno5B1Q/view?usp=drive_link

You may also like…

January Free Printables

Welcome to 2024

Here we are, with the first post of a new year! To start off we’ve got a new set of monthly printables, this collection inspired by some snowy robins.

PPP Family members can access the printable here.

If you’re not already a part of the PPP family, you can access the freebie library by signing up here:

Processing…
Success! You're on the list. You should receive an email with the password shortly, in the meantime, the files for this project can be found here: https://drive.google.com/file/d/1Pi1fgvrbDHuHH19pYcYsY_jHzMl2N-hd/view?usp=drivesdk

You might also like…

Winter Wonderland Village

I’ve always loved the look of various dough and clay based decorations one finds around this time of year, and the other day I decided to try my hand at one of my own.

Every year I build a custom gingerbread house and it’s always a joy to design each element, so I was thinking of ways to adapt salt dough style projects to the 3d world, while also accomplishing this within the space of a single afternoon (no trips to the store allowed). This fairly severely limited what I could do, and caused a couple challenges with the final product that could have been avoided, but it worked out nonetheless.

To start off I took a dive into the world of homemade clay–which ranges from salt dough and playdoh, to air dry porcelain clay. I’ve had good luck with this recipe before, or using a more traditional play dough recipe, and I would recommend just following one of those if you want to try this, but I was lacking in a few ingredients, so I set about to make my own.

I’m not going to walk you through the whole thing since in the end it didn’t do what I wanted and ended up cracking a fair amount, but I made myself some clay like substance and got it rolled out into a thin sheet.

Next I started on making shapes. I was going at it freehand, but if you want to make this project as well, I’ve made a template available in the freebie library.

Once I had all the pieces cut, I laid them out on a baking sheet and set my oven as low as it could go. It took about an hour for these to dry but results will vary depending on what clay recipe you use.

I chose some of the elements in my makeshift clay recipe in hopes of getting whiter results than one does with traditional salt dough, but alas this was not the case, so I grabbed some paint.

I painted each house white, being sure to cover all sides, and then coated them with mod podge (I like to use satin finish but gloss or glitter would also be great for this).

I was going to do the same for the trees, but while digging around for the mod podge I ran across my old friend rub n buff, and I knew the trees needed to be silver.

Once everything was appropriately colored, sealed, and glued back together (seriously, actually follow a clay recipe) I glued all the parts together with some hot glue.

And there you have it your very own winter village! It works great lit with a tea light or a string of fairy lights.

If you decide to try this for yourself, be sure to share it with us by tagging @pinsprincessesandpioneers on Instagram and Facebook or commenting below!

PPP Family members can find the printable file for this project in our freebie library.

If you’re not a member, join for free below and gain access to all our freebies!

Processing…
Success! You're on the list. You should receive an email with the password shortly, in the meantime, the files for this project can be found here: https://drive.google.com/file/d/1uBagV01deauI3qfTqqdRWzvRV5Oi3pLK/view?usp=drive_link

You might also like…

Vintage Hanukkah Box

For anyone in need of a last minute hannukah gift wrap, I created this vintage inspired box which can be made from a single sheet of paper or card stock.

I started off by drafting a basic box template (which I will be using to create some more holiday boxes in the near future) and working to get the most possible real estate out of a single sheet of 8.5×11 paper.

Initially I thought the ends could slot together, but in the final version I would suggest securing them with a bit of tape

Once I had the shape, I went about collecting some graphics. Anyone who’s been around for a while will know, I love the vibe of junk journals and using that to create different projects and this one is no different-if a tad more difficult. While it’s easy to find vintage images for most of my projects, there is far less in the way of vintage judaica floating around the internet so I ended up having to modify these graphics a bit more, and invent a few of my own.

When I finally had the template covered, I cut it along each of the edges to create a small box, and there you have it a vintage inspired Hanukkah box from just one sheet of paper!

If you decide to use this, be sure to share your creations by tagging us on Instagram and Facebook @pinsprincessesandpioneers, or commenting below.

PPP Family members can find the printable file for this project in our freebie library.

If you’re not a member, join for free below and gain access to all our freebies!

Processing…
Success! You're on the list. You should receive an email with the password shortly, in the meantime, the files for this project can be found here: https://drive.google.com/file/d/1y_3UbGo3Zic1PhK8Ktl1Hwe1UUytc2pV/view?usp=drivesdk

You might also like…

Dancing Dreidels

It can be really hard to find cute and cozy Hanukkah decor, so as part of a continuing quest to create some, this year I decided to make a stuffed felt dreidel! Like all of my felt project, this is cut and sewn not felted, and requires an absolute minimum of materials and time.

To start off I grabbed 2 pieces of felt (although the contrast piece can be a scrap for this one as its less than half a sheet), some stuffing, and for this one a bit of yarn.

I wanted to make mine as big as possible given the constraints of a sheet of felt so I measured it out on the felt instead of cutting the pattern, but I have one available in the freebie library, it’ll just be a hair smaller.

If you’re measuring it out yourself or want to make a larger one with bolt felt I’ve explained the math to scale it here.

Once I’d figured it out and cut the pieces in both colors I grabbed my yarn and backstitched the letters onto each panel in simple block text. Embroidery thread would also work for this, but I wanted the chunkiness of the yarn to help the letters show up.

Once they were embroidered, I attached the 4 letter panels with a simple running stitch.

Then it was time to close up the body. Starting with the pint, I brought each of the 4 triangles together and closed it up along the open corner.

Then I made the stem by folding a small scrap over double and then joining the edges. I attached it to the center of the top square using quadruple threads like I would for a button.

Then I sewed the square into the top on 3 sides.

Next it was time for stuffing! I grabbed a few fistfuls of poly fill and tucked them into the dreidel making sure to fluff out all the corners.

Once it was stuffed I closed up the last edge, easing it a bit at the corners to help it line up properly.

And there you have it a stuffed felt dreidel! It can’t spin but you could actually play the game with it if it was tossed like a die, as it will only land on one side, or it makes a nice plush for a kid or pet. If you decide to make this project, please share it with us by tagging @pinsprincessesandpioneers on Instagram and Facebook, or commenting here.

The printable pattern for this project is available in the Freebie Library which is open to all PPP Family Members!

If you’re not already a member of the PPP Family, you can join for free by signing up below:

Processing…
Success! You're on the list. You should receive an email with the password shortly, in the meantime, the files for this project can be found here: https://drive.google.com/file/d/1u8R4C3ZIaSTlNG6UE8nHRv4ETkwNHCJV/view?usp=drive_link

You may also like…

Thanksgiving Place Cards

I love a good tablescape as much as the next girl, but at my family’s thanksgiving table there us usually basically no room for anything other than food and plates (and sometimes even that’s a squeeze). However that’s no excuse to fall off the fall decor bandwagon early, so I put together these quick and easy printable fall place cards!

These can be done either as simple cards, using only the nameplates, or they can hold themselves up and display another little pumpkin to the person sitting across the way with the included stands.

To make the stands I cut the page into 8 strips, each with a pumpkin in it. Then I folded each strip in half, twice.

Then I glued the strip to itself so 2 parts overlapped, forming a triangle.

And finally I glued the nameplate to that. (I would suggest writing on the nameplates before attaching the stands)

And there you go, a super easy and pumpkin place card to add a touch of fun to your holiday table!

If you decide to make these, please share them with us by tagging @pinsprincessesandpioneers on Facebook or Instagram!

The printables for this project are available in the Freebie Library which is open to all PPP Family Members!

If you’re not already a part of the PPP Family, you can join for free by signing up below:

Processing…
Success! You're on the list. You should receive an email with the password shortly, in the meantime, the files for this project can be found here: https://drive.google.com/drive/folders/12WDq8JRjHpK-zpowIwm26PdvHdzRiwVP?usp=drive_link

You May Also Like…

Mantles and More

About a month ago, I undertook a weekend to build a mantlepiece with nothing but cardboard, paint, and a bit of tape, and the results were if I do say so myself, quite impressive especially given the literal pile of trash we started with.

However, ever since constructing my mantle, I’ve been haunted by its hollowness–not its literal hollowness mind you, although that is definitely the case but rather the empty space where a real mantle would have its hearth. Now considering that this is a cardboard construction against an interior wall and situated on carpet, I was not about to remedy this by lighting actual fire but I decided a fireplace filler couldn’t hurt.

If you search fireplace filler, you’ll be rewarded with all kinds of alternatives to fire from books to stacks of logs that fill the entire opening, but while I may eventually try one of these for my first attempt I wanted something neutral that could fit in with my rotating holiday decor, would add to the illusion of a mantlepiece, and most importantly didn’t cost much. After all it wouldn’t do to have the even more temporary filler be worth more than the mantle itself.

After digging through every picture of a fireplace I’ve ever taken and a number of home magazine photos from the internet, I settled on putting in some faux brickwork to encase the area that would traditionally hold fire, and filling in the center in black giving a appearance similar to most modern gas fireplaces.

I started out by gathering up some white and black poster board, some masking tape, a bit of paint, and a couple paper bags.

First I split open the bags, one paper grocery bag and one lunch sack, at the seam like you would to cover a textbook, so as to get the most paper. Using the size of the lunch bag as my guide, I cut out some rectangles and rounded off the corners.

Then I traced the shape on the grocery bag and cut roughly the same size from that. Each “brick” was then crumpled and flattened back out to give it some texture.

To create a base to attach the bricks to, I took the white poster board and cut it to size to fit inside the fireplace, with one wide piece to form the top, 2 narrower pieces for the sides, and enough space in the middle for most of the black posterboard to show through.

Onto that I applied my ‘mortar’, masking tape laid out in the pattern of the bricks. This also helped me to keep the layers straight as my bricks varied in size a fair bit.

Once the mortar was laid out, I tested out the bricks in a couple different patterns until I found one I liked.

The next day I pulled out the paint and started turning my mortar gray. It’s important to use matte paint for this, and this time I actually remembered to buy matte, so I didn’t have to mix it with baking powder as I went along, yay!

Once all the mortar was painted, It was time to attend to the bricks. I wanted to give them a whitewashed feel, so I mixed a bit of white paint with water and applied a wash to each brick.

For the first batch that was pretty much all I did, but by the second I remembered that I had recently acquired some distressing spray in hickory smoke, and really where do you use that if not on a fireplace? This stuff calls for being sprayed on and then sprayed with water to achieve a mottled effect, but if you have outdoor painting space, spattering would work as well.

Once all the bricks were ready, I laid them out again and started gluing them down. I started off trying to use a thin layer of school glue under each brick, but the moisture was warping the poster board to much so I switched to hot glue fairly quickly.

Once all the bricks were in, the mortar looked to dark so I came back in with a bit of white on my chip brush and stippled it in to create a softer effect.

Finally it was ready to go up. I tacked in the black posterboard with a bit of masking tape and then slid the whole thing in behind the mantle. I stuck it to the wall with a couple small rolls of masking tape just to keep it from sagging, and there you have it, a mantle now with a fireplace!

I love that this feels like a part of the unit, and can go with all of my different holiday and everyday decor, plus I think it adds some more depth to the whole thing. Would you try this in your own home? Let me know in the comments!

Become a member of the PPP Family and gain access to our freebie library!

Processing…
Success! You're on the list.

You may also like…

Easy Halloween Rosettes

This year October feels like it has positively flown by, so if you find yourself like me having to add tome pizzaz to your Halloween at the last minute, these are a great choice for something that will look like you’ve been working on it all month!

Rosettes are great and versatile craft because they can be made out of almost anything, and they look great no matter what, and if you’ve got some thematically appropriate scrap materials lying around, this can be an awesome way to use them I needed a couple more patterns than I had in my scrap pile, so I created a printable version of this craft as well.

To start off I wanted to figure out how long the paper needed to be for each size of wheel, so I made a quick test pattern (I know there’s a mathematical way to do this, but I didn’t have the brain power to deal with it while making these).

Based on these results I found that the 10 printable inches of a sheet of copy paper are in fact the minimum for a 2.5″ rosette, but the smaller 1.5″ layers could be made a bit shorter.

Then I went in and added some spooky and vintage patterns and some vintage graphics for the centers.

For time’s sake, I folded the strips before cutting the pattern in the top. There are some dotted lines to help you fold the printable, but just it’s a 1/4″ accordion fold all the way along.

Once the strips were folded, I cut the tops about 8 sections at a time. For the pointy pattern, its simply an angle cut across the sections, while the round edges need the whole curve cut.

Then I grabbed a glue stick and glued the ends together making tiny crowns.

To set the rosettes I used some hot glue and some parchment paper. Putting about a dime sized dot of glue on the parchment, I squished the center of the rosette into it and held it down until it had started to cool. By doing this on parchment, you can easily peel up the rosette once the glue is fully cool and it should hold its shape.

I tried the stacking 2 ways-one building the 2nd rosette on top of the 1st, and one gluing it on the parchment separately and attaching them after. I found that creating each rosette separately first and then attaching them makes for more even folds, but it does also result in a slightly taller final product.

Once the 2 layers are connected, its time for the center. I fussy cut the images with some small scissors, and then added just another dot of hot glue to the middle of the top rosette.

And there you have it, a beautiful vintage inspired rosette (or 2)!

These went fairly quickly and I love how they turned out, but if you need a REALLY quick thing to add in, I also love these Vintage Halloween Tags from The Graphics Fairy. Happy crafting and Happy Halloween! 🎃

If you would like to make a set of your own, the free printable template can be found in the Freebie Library, available to members of the PPP Family!

Sign Up now to join the PPP Family and access the Freebie Library!

Processing…
Success! You're on the list. You should receive an email with the password shortly, in the meantime, the files for this project can be found here: https://drive.google.com/file/d/1zaQERF96MqFyz_40d05iBJF7EXTUMmsu/view?usp=drive_link
Design a site like this with WordPress.com
Get started